
When to repot an orchid and how to do it
Repotting an orchid
Repot moth orchids roughly every two years for a specific reason: pine bark supporting their roots decomposes into compact humus that suffocates them. The right time is after flowering, as new root tips appear. Replace all the medium, use a barely larger clear pot and cut only dead roots.
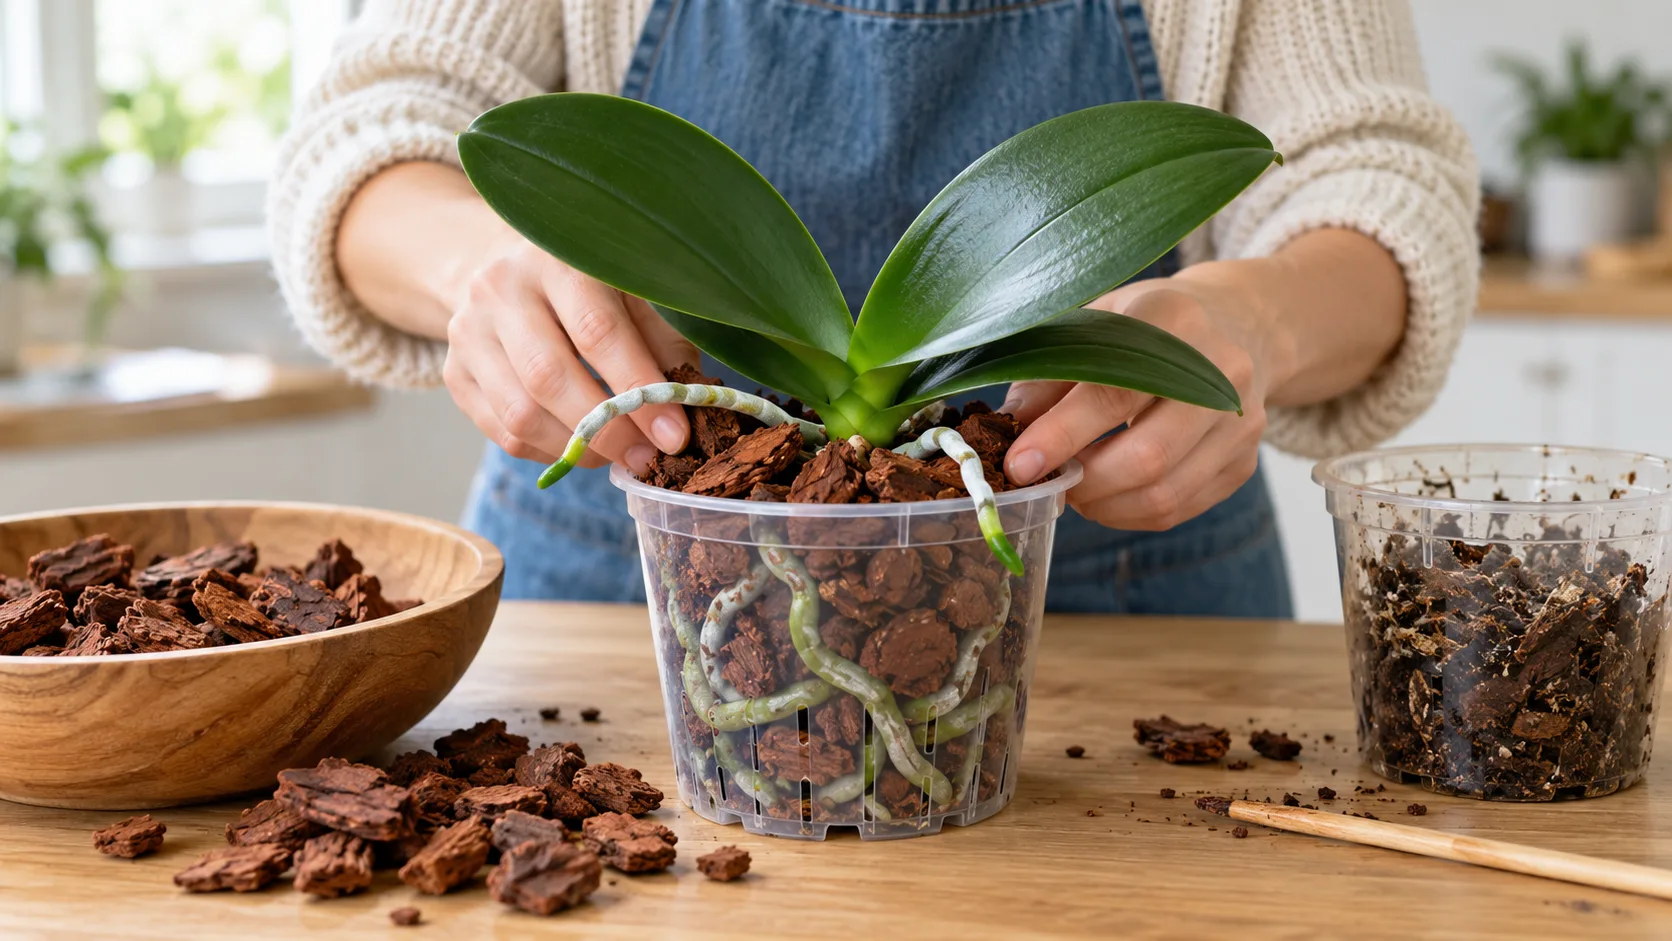
When to repot an orchid: signs that matter
Repot when the medium stops drying, the plant rises from its pot or bark crumbs wash out during watering. Calendar comes second: most sources agree on repotting every two years, roughly pine bark's lifespan.12
Moth orchids (Phalaenopsis) live attached to branches, roots in air. In pots they depend on medium imitating bark: coarse, highly porous and airy. As it degrades, roots in the rootball center lack oxygen and die first.3
| What you see | What it means | Decision |
|---|---|---|
| Medium stays constantly damp after watering | Bark has compacted and holds water4 | Repot |
| Fine brown crumbs emerge through holes at every watering | Bark is breaking up2 | Repot |
| Bark resembles mulch or potting mix | Decomposed medium, lost drainage5 | Repot |
| Plant tips or rises, stem base above the pot | Cramped roots or stem risen above medium43 | Repot |
| Brown hollow roots visible through the pot | Degraded medium, often signaled by dead roots6 | Repot without waiting for the season7 |
| A few firm green or silver roots outside the pot | Aerial roots, normal for an epiphyte1 | Do nothing |
The last row prevents unnecessary repotting. Roots overflowing a pot are not a signal on their own: the RHS says neither bury nor cut them.1 They matter only when the plant becomes unstable or the medium beneath has aged.
To inspect roots without unpotting, look through the clear pot: velamen turns green when hydrated, silvery gray when thirsty, and dead roots dark brown.53

The right time: after flowering, as roots restart
Ideally, repot at the end of flowering as new root tips appear. The American Orchid Society recommends spring, just after flowers; SNHF gives the marker: new roots around 1 cm (0.4 in) long, short enough not to break, active enough to quickly colonize fresh bark.89
| Task | January | February | March | April | May | June | July | August | September | October | November | December |
|---|---|---|---|---|---|---|---|---|---|---|---|---|
| Watering | reduced | reduced | moderate | moderate | high | high | high | high | moderate | moderate | reduced | reduced |
| Growth | resting | active | active | strong | strong | strong | strong | strong | active | active | active | resting |
| Feeding | yes | yes | yes | yes | yes | yes | yes | yes | yes | no | no | yes |
| Repotting | no | no | favorable window | favorable window | favorable window | no | no | no | favorable window | no | no | no |
- Repot
- Every 1 to 2 yearsSource: University of Maryland Extension
- Repot
- Every 1 to 2 yearsEvery year, at most every two yearsSource: Jardins de France (SNHF)
- Repot
- Every 2 yearsSource: Royal Horticultural Society
- Repot
- Every 2 yearsApproximatelySource: Clemson Cooperative Extension
- Repot
- Every 1 to 3 yearsSource: American Orchid Society
- Repot
- Every 2 to 3 yearsSource: Muséum national d'Histoire naturelle
- Repot
- Every 2 to 3 yearsSource: Vacherot & Lecoufle
- When to repot
- March to May, Septemberwhen new growth beginsSource: University of Maryland Extension
- When to repot
- After floweringin spring, as soon as new root tips appearSource: American Orchid Society
- Avoid
- November to FebruarySource: Vacherot & Lecoufle
- The new pot
- 2 cm widerSource: Vacherot & Lecoufle
- Pot diameter
- 15 to 20 cmMature plantSource: American Orchid Society
Maryland Extension stresses that growth restarting matters, not necessarily flowering ending.5 RHS agrees, permitting repotting in any season while roots have green tips.1 In its French seasonal growing context, Vacherot & Lecoufle instead discourages November to February, when growth slows. Follow actual root activity and light rather than the months alone.10
The French profile’s calendar for its source climate places repotting March to May, then September, avoiding midsummer and October to February. Use local light and new root growth to interpret these seasonal examples.
What about flowering or newly bought orchids?
Repot flowering orchids only in emergencies. AOS does not forbid it but warns that flowers may drop sooner.7 A UC Master Gardener did it successfully: possible, not recommended as a rule.11
Bought plants are a special case. Many commercial orchids grow in sphagnum, moss that does not dry during transport or on shelves but holds too much moisture around roots long-term.2 Compacted sphagnum in a small pot feels like a dense spongy mass, without bark pieces. Clemson recommends switching to bark after flowering.2
Rempoter juste après les fleurs laisse ensuite toute l'année pour la hampe suivante. Si vous avez an orchid that will not rebloom depuis un an, regardez d'abord la chaleur des journées à l'automne.
Why bark lasts only two years
Pine bark is a living medium that decomposes: it dries fast during month one, then becomes humus in around two years. AOS describes this cycle in its beginner series: fresh bark dries very quickly, even pre-soaked, then absorbs water after a month and begins rotting through micro-organisms.3
The result is fine humus that holds water and excludes air. This suffocation kills central roots, while active roots retreat against pot walls, where oxygen remains.3 SNHF adds that aging medium becomes more acidic.9 Orchids prefer pH 5.5 to 6.5, according to the moth orchid profile.
Hence similar recommended intervals of one to three years, gathered in the guidance above.
No source exceeds three years. Three years is a ceiling: by then even good bark has become humus, and the table's signs are more reliable than dates.34 Another detail: high-nitrogen fertilizer speeds bark decomposition, according to AOS.3
Le choix de l'engrais change donc aussi la durée de vie du substrat : orchid fertilizer se choisit selon la saison et l'âge de l'écorce.
Other houseplant potting mix ages similarly: refreshing a plant's potting mix shows the signs.
Which orchid medium, and why never potting mix?
Medium-grade pine bark, without soil or potting mix. Multipurpose potting mix kills moth orchids: RHS states this unequivocally.1 Vacherot & Lecoufle likewise requires bark free from all soil or potting mix, which would suffocate roots.10
Inspect bags labeled “orchid potting mix” before buying. SNHF warns that many orchid mixes suit terrestrial orchids such as cymbidium (Cymbidium) or slipper orchid (Paphiopedilum), but perform poorly for epiphytes.9 Recognize a suitable product by distinct bark pieces, without fine dust or peat fibers clogging gaps.

Four bark-based mixes
| Mix | Composition | For whom |
|---|---|---|
| Bark alone | Medium pine bark, fine for seedlings89 | Mature plant, regular watering |
| Structured bark | Medium pine bark, charcoal and perlite, clay pebbles or lava rock to maintain air9 | Generous waterers |
| Bark and volcanic rock | Half bark, half crushed volcanic rock (pozzolana), around 1.3 cm (0.5 in) pieces: a volunteer gardener's practice learned from an orchid grower11 | Generous watering, mature plants |
| Bark and sphagnum | Bark with a little sphagnum or tree-fern fiber7 | Heated home, dry air, forgetful waterer |
Each ingredient has a role. Horticultural charcoal binds excess salts and makes bark last longer; perlite reduces water retention; dry sphagnum does not alter pH but repels water once dried out: moisten five minutes before watering.7 Lava rock provides a mineral framework that never rots.
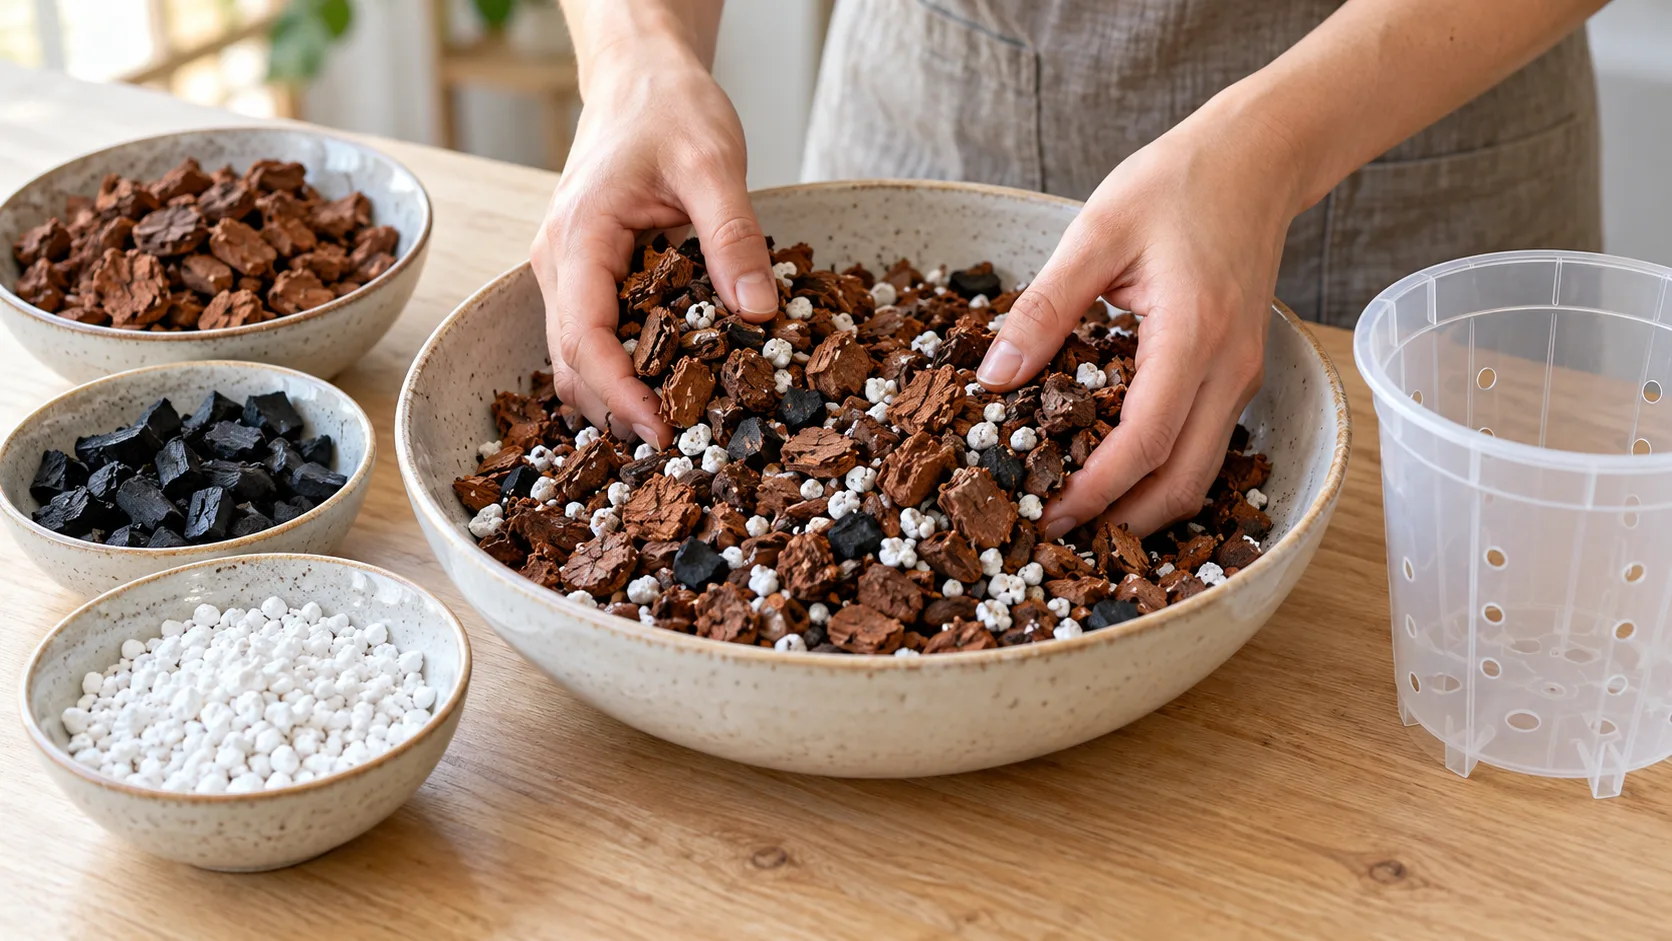
Sources differ somewhat on grade. The AOS culture sheet prefers fine bark at every age indoors, in a slotted pot inside an outer pot holding around 1.3 cm (0.5 in) of water.8 Its beginner series warns instead that wet fine mix lacks oxygen, and many good growers keep medium or coarse grades except for seedlings.3 Without that arrangement, medium grade remains safest.
The adjustment rule: the more often you water, the coarser the mix; the drier the air or more often watering is forgotten, the more it should hold water.7 Changing medium is easier than changing habits, AOS summarizes.
Unsure yours is a moth orchid? Cymbidium and bamboo orchid need different media. Scan with Floralens: the app identifies the genus and sends matching care reminders. The cymbidium profile details its needs; bamboo orchid care covers Dendrobium.
Which pot should you choose for an orchid?
Clear plastic, with drainage holes, barely larger than the root mass. Clear plastic shows moisture and root condition, and some roots photosynthesize in light.17
| Material | Recommendation | Why |
|---|---|---|
| Clear plastic | Ideal | Dries slowest; the standard choice indoors Source: American Orchid Society |
| Slotted orchid pot | Suitable | Side slits let air reach the roots Source: University of California |
| Glazed ceramic | Suitable | Only as an outer decorative pot; often has no drainage hole Source: American Orchid Society |
| Terracotta | Avoid | Possible, but ruled out for indoor growing by the AOS Source: American Orchid Society |
| Metal | Avoid | Leaks or corrodes Source: American Orchid Society |

Size follows roots, never foliage: repot for the bottom of the plant, not the top.6 If cleaned healthy roots fit the old pot, reuse it.1 Otherwise Vacherot & Lecoufle recommends 2 cm (0.8 in) extra diameter, no more.10 Mature orchids often end in 15 to 20 cm (6 to 8 in) pots because roots are long and inflexible.3
An outer pot reconciles appearance and cultivation: the clear pot goes inside, decoration outside.7 Orchid pots with side slots add air laterally.11 In every case, drainage holes, without exception.7
Repotting an orchid, step by step
You need disinfected pruning shears, bark moistened the day before and a wooden stick.104 Prepare medium first: soak one hour, then squeeze by hand.9 Pre-wetting also removes fine dust.2
- Soak the plant in water for one hour before unpotting: softened roots release old medium and walls without breaking.95
- Unpot, tapping the rim or squeezing flexible sides.4 If roots still cling to walls, extend soaking until they release intact.5
- Remove all old bark by hand, then rinse roots. Partial repotting leaves humus centrally, where it does most harm.13
- Trim dead roots and remove a spent spike if dry (see below).14
- Fill the base with the largest bark pieces, around a quarter of pot height.2
- Center the plant, roots spread, with the crown base at the medium's surface, the same height as before.81
- Fill with bark, working it between roots with the stick, then firm around the edges with your thumb, without crushing perlite.112
- Leave aerial roots outside if they arise above the pot: buried, they may rot (see below).1
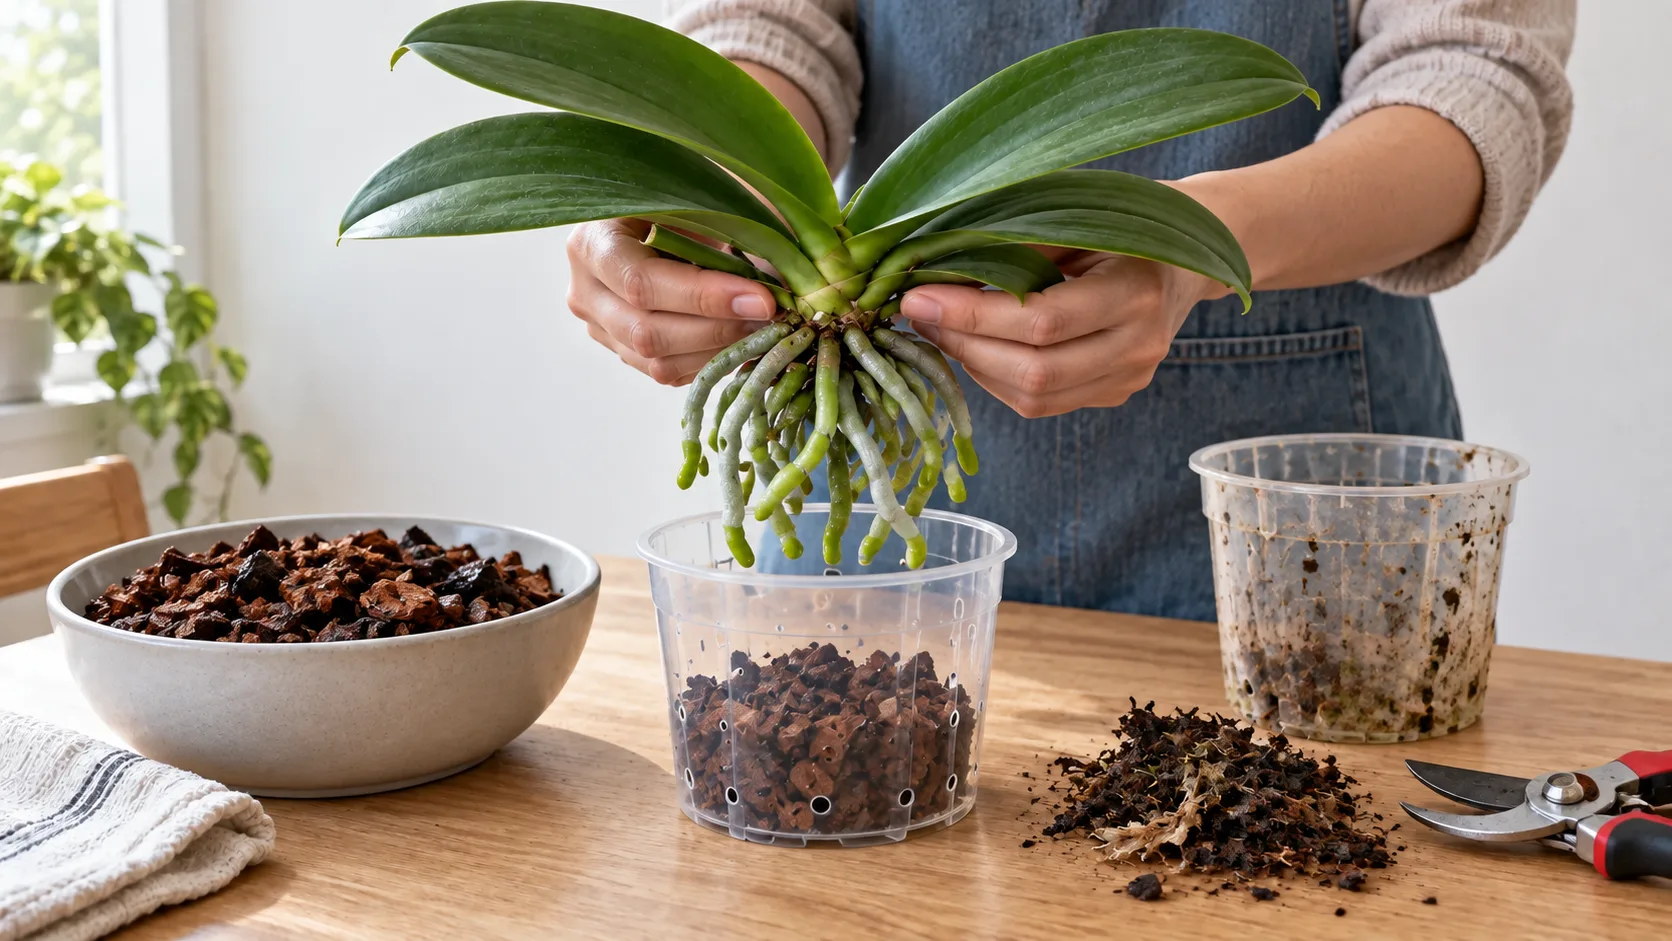
Final test: lift the plant by its leaf bases. Pot and medium should come with it. Loose bark lets the plant move, damaging new root tips.110 If it still leans, a small stick supports it until roots establish.1
While unpotted, inspect leaf bases and roots: white cottony clumps reveal mealybugs, often hidden in bark. Orchid-specific treatment is detailed in scale insects: identifying and removing them.
Which roots to cut, which to keep
Cut only brown, soft, dried or hollow roots; keep all firm roots. Healthy roots are firm and full, silvery white or green, with green growing tips.12 Dead roots collapse between fingers, their covering slipping off a central thread.
| Feature | Healthy root, keep | Dead root, cut |
|---|---|---|
| Color | Silvery white, green after watering | Dark brown to black |
| Feel | Firm, full, elastic | Soft, spongy, or dry and hollow |
| Tip | Glossy green if growing | Missing or blackened |
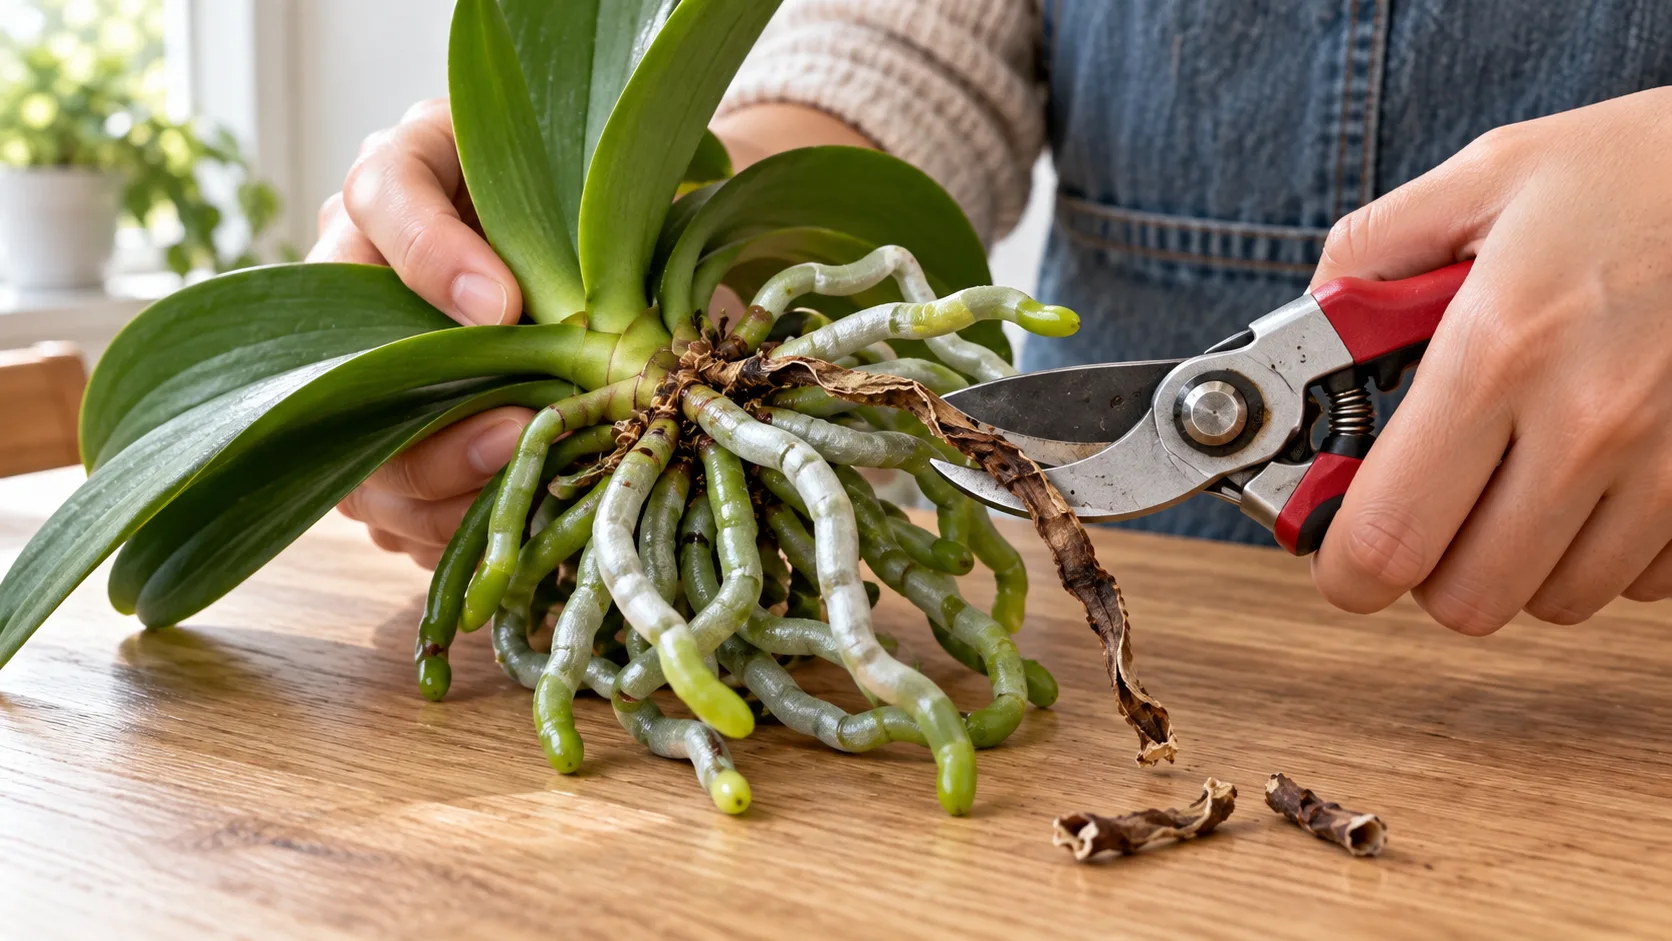
Left in place, dead roots keep rotting, sustaining moisture around healthy ones.2 Cut with a new or disinfected tool, using alcohol or flame.10 SNHF dusts wounds with cinnamon, a household antiseptic.9
What about overlong healthy roots? RHS shortens them to around 12 cm (4.7 in) to fit the pot.1 Avoid excess: an orchid survives repotting provided no more than half its roots are damaged, estimates AOS.7 Dozens of rotten roots indicate overwatering: root rot helps find the cause.
What about aerial roots?
Do not bury them or cut firm ones: they stay outside after repotting. An aerial root does what it would on a branch: anchors the plant and absorbs air moisture. RHS says neither bury nor cut them, since covering an aerial root with medium risks rot.1 The Museum removes only dried-out ones.4

When most roots escape, inspect the medium. AOS observes that a moth orchid in overly dense mix produces roots refusing to enter it, running over the surface and rim instead.3 The remedy is airier, medium-grade bark; roots already outside remain in air.
La hampe et les vieilles feuilles se nettoient au même moment : pruning an orchid after flowering se fait au-dessus du bon nœud.
After repotting: water immediately or wait?
Sources divide into two approaches, and the choice depends on what was cut. RHS, American extension services and the Museum water the same or following day to settle bark around roots; SNHF and Vacherot & Lecoufle wait for wounds to heal.
| Source | First watering | Meanwhile |
|---|---|---|
| RHS | Same day, thorough watering then drainage1 | Nothing specific |
| Clemson, University of Maryland | Same day, generously25 | Nothing specific |
| French National Museum of Natural History | By the next day at latest4 | Nothing specific |
| SNHF (Jardins de France) | After 10 to 15 days9 | Mist leaf undersides with rainwater |
| Vacherot & Lecoufle | After around a month, when new roots appear10 | Spray the pot surface each morning |
Our reading: if only a few dead roots were cut, water the same or next day, like RHS and the Museum; fresh bark moistened the day before will not remain saturated. If many roots were cut, healthy or rotten, follow SNHF: one to two weeks without watering, with foliar misting against dehydration.9
Afterwards, fresh bark dries faster than old bark: during month one it has not soaked through, so newly repotted plants often need closer watering intervals.3 Watch root color, rather than dates.
Le rythme habituel reprend ensuite, réglé sur la couleur des racines : watering an orchid se fait par un bain de quelques minutes plutôt qu'à l'arrosoir.
Fertilizer waits around a month. SNHF resumes only then, Vacherot & Lecoufle only with visible new roots.910 Orchid roots burn easily from fertilizer salts3: fertilizer burn explains the mechanism. Finally provide bright light without direct sun and stop moving it during recovery.
Une feuille du bas qui jaunit dans les semaines suivantes n'est pas toujours liée au rempotage : yellow orchid leaves ont chacune leur cause.
An orchid that has lost almost all its roots
Repot in the smallest possible pot and enclose beneath a plastic bag in shade until roots restart. This is Ned Nash's AOS method: humid air, fairly dry medium.12
It relies on turgor: without roots, the plant cannot drink, and saturated air in the bag limits leaf water loss. A wire loop in the pot holds plastic above foliage.12 Water the medium once, then await new roots: a few days to several weeks, longer from late September to January in the AOS source’s seasonal example as days shorten. Local light and root activity matter more than those dates.12
An orchid in saturated bark does not wait for spring: the general method is in emergency repotting for drainage. Other year-round care, including watering, light and flowering, follows the orchid care guide.
Frequently asked questions
Can you repot an orchid in multipurpose potting mix?
No. Multipurpose potting mix compacts, holds water and starves roots adapted to tree bark of air: RHS says it kills moth orchids. Use pine-bark medium without soil, in distinct pieces. 1