
Why are my orchid leaves turning yellow? Causes and care
Why orchid leaves turn yellow
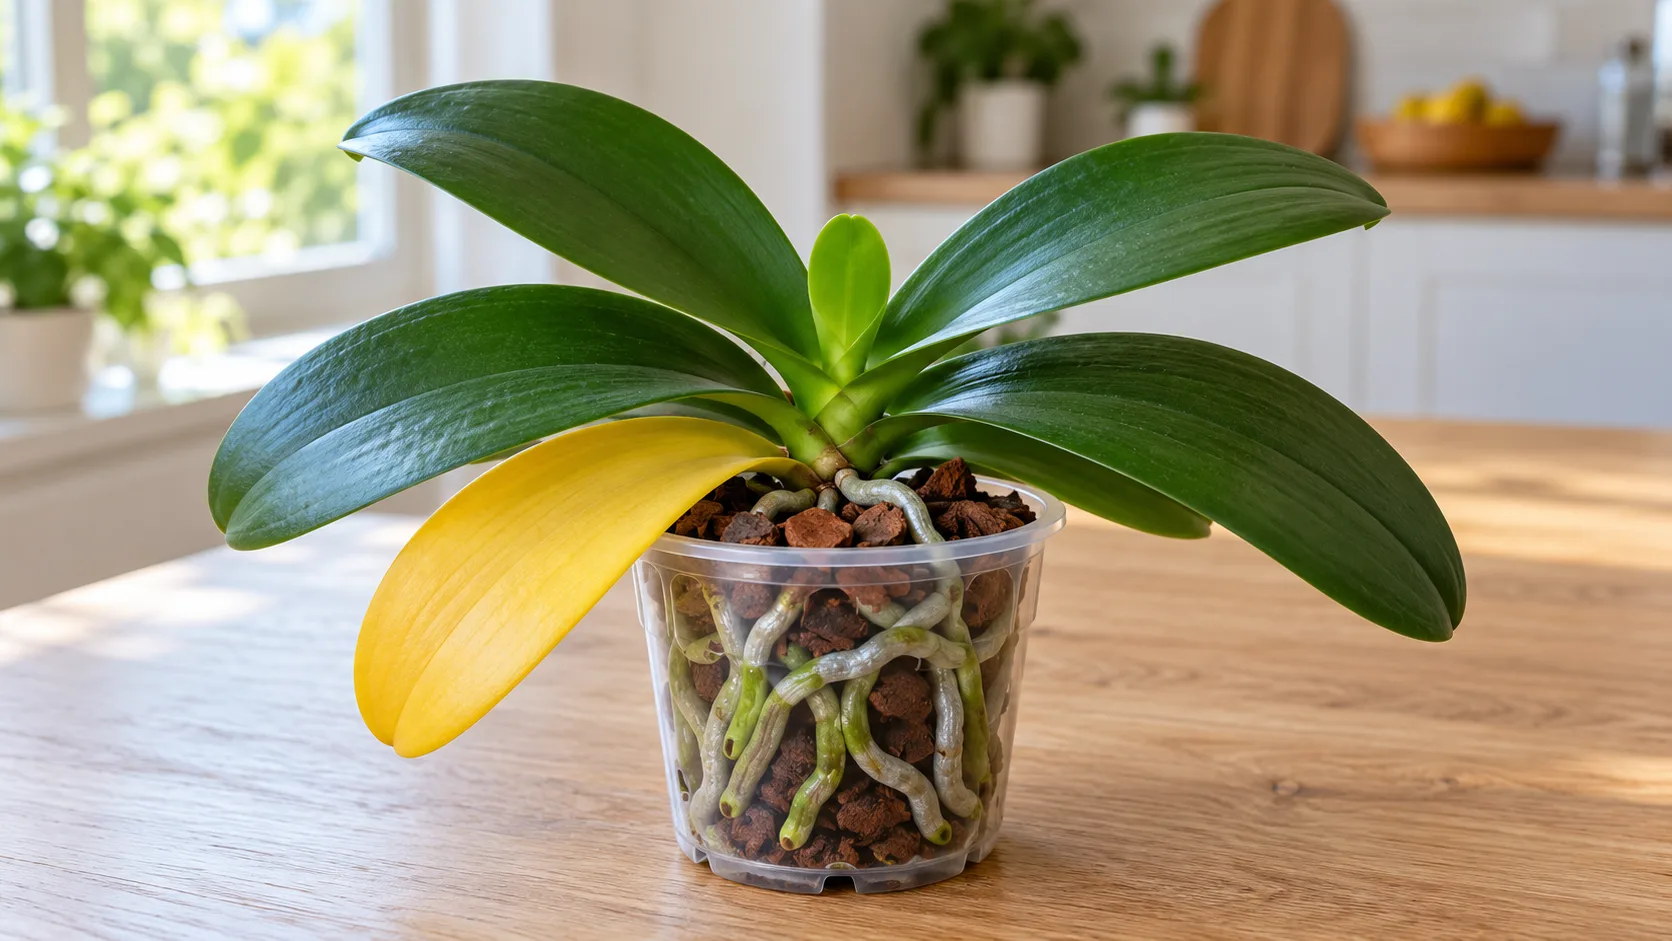
A moth orchid (Phalaenopsis) occasionally loses its lowest leaf: it slowly turns a clear yellow while a new leaf grows at the top, and nothing needs correcting. Other yellowing needs investigation, usually inside the pot: soft, yellowing leaves on a well-watered orchid point to rotten roots that no longer absorb water.
Normal or concerning: three checks
Three observations distinguish almost every case: which leaf is yellowing, its texture, and the color of the roots. A moth orchid's (Phalaenopsis) clear pot makes the third check immediate.
- Which leaf? The lowest leaf alone, while a new one emerges at the top: normal leaf loss.1 Several leaves at once, or young leaves: a warning sign.2
- What texture? Clear yellow on a firm blade: aging or deficiency. Soft, watery yellow that turns black: rot or cold damage.3 Wrinkled, limp yellow: the leaf lacks water, whether the roots are dry or dead.4
- What roots? Covered in velamen, they are green when hydrated, silver-gray when thirsty5, and brown, soft, or hollow when dead.6
| What you see | Likely cause | When to act | First action |
|---|---|---|---|
| The lowest leaf alone, an even, clear yellow | Normal aging 3 | No deadline | Let it dry, then remove it with a gentle tug |
| Several soft, thin, drooping leaves; brown roots | Rotten roots: excess water or decomposed bark 4 | This week | Unpot, trim dead roots, and use fresh bark |
| Yellow, then black and soft where water collects; central leaf comes loose | Crown rot or bacterial soft rot 3 | Today | Cut away affected tissue, drain the crown, and isolate the plant |
| All foliage pale yellow-green, with pinkish or reddish edges | Too much light 5 | This week | Move back from the window and add a sheer curtain |
| Whitish or yellowish patch on the highest part of a leaf, turning brown | Sunburn 4 | No action can restore the leaf | Move the plant; the scar remains |
| Sunken, watery areas; young leaves soft after a draft or cold water | Cold damage 3 | Today | Move into warmth and remove destroyed leaves |
| Several older leaves yellowing during spring growth, with healthy roots | Nitrogen or magnesium deficiency 7 | This month | Complete fertilizer containing magnesium |
| Wrinkled yellow leaves, gray dry roots, and a light pot | Underwatering, overly dry air 5 | This week | Ten-minute soak and a damp pebble tray |
| Tiny yellow dots and fine webs underneath | Spider mites or scale insects/mealybugs 4 | This week | Inspect leaf undersides and treat |
| Yellow streaks, rings, or mottling; streaked flowers | Virus 4 | Isolate immediately | No treatment: isolate or destroy the plant |
The table's main lesson: yellowing from the center puts an orchid in much greater danger than yellowing from the bottom. On a plant that grows only from its tip, a lost crown cannot be replaced.4
How much time you have
Causes progress at different speeds. The American Orchid Society gives a few hours to a few days for bacterial infections, a few days to a few weeks for fungal infections, and weeks to months for medium compaction.1
The first two bars are easy to underestimate: freezing cold blackens and pits leaves overnight1, and soft rot can destroy a whole plant in two to three days.4 In hot conditions, spider mites complete a generation every six days, requiring repeated treatment.4 At the slower end, decaying bark causes yellowing over weeks or months.1 In a photograph published by the American Orchid Society, the same orchid had resumed growth three months after repotting in fresh bark.4
One yellow bottom leaf: normal leaf loss
A moth orchid occasionally loses a bottom leaf, often during spring growth as new leaves form at the top.1 This is senescence, which University of Maryland Extension considers normal in the oldest leaves.2
The plant's growth habit explains this. A moth orchid grows from one central stem: a new leaf emerges at the top, the oldest eventually leaves at the bottom, and the rosette keeps roughly the same number of leaves.4
The pattern is easy to recognize: bright, even yellow, without spots, affecting one leaf at a time, which then falls naturally.3 Meanwhile, the plant moves nutrients from the old leaf into new growth.1
Do not cut this leaf off too soon. The American Orchid Society advises letting the plant reabsorb minerals, then waiting for the abscission layer to form: the leaf then comes away with a gentle tug.1
Most houseplants do the same: yellowing bottom leaves covers this across species.
Côté fleurs, la règle est ailleurs : restart a flower spike demande quelques semaines de journées à 25 °C au plus.
Soft, yellow leaves: roots no longer absorb water
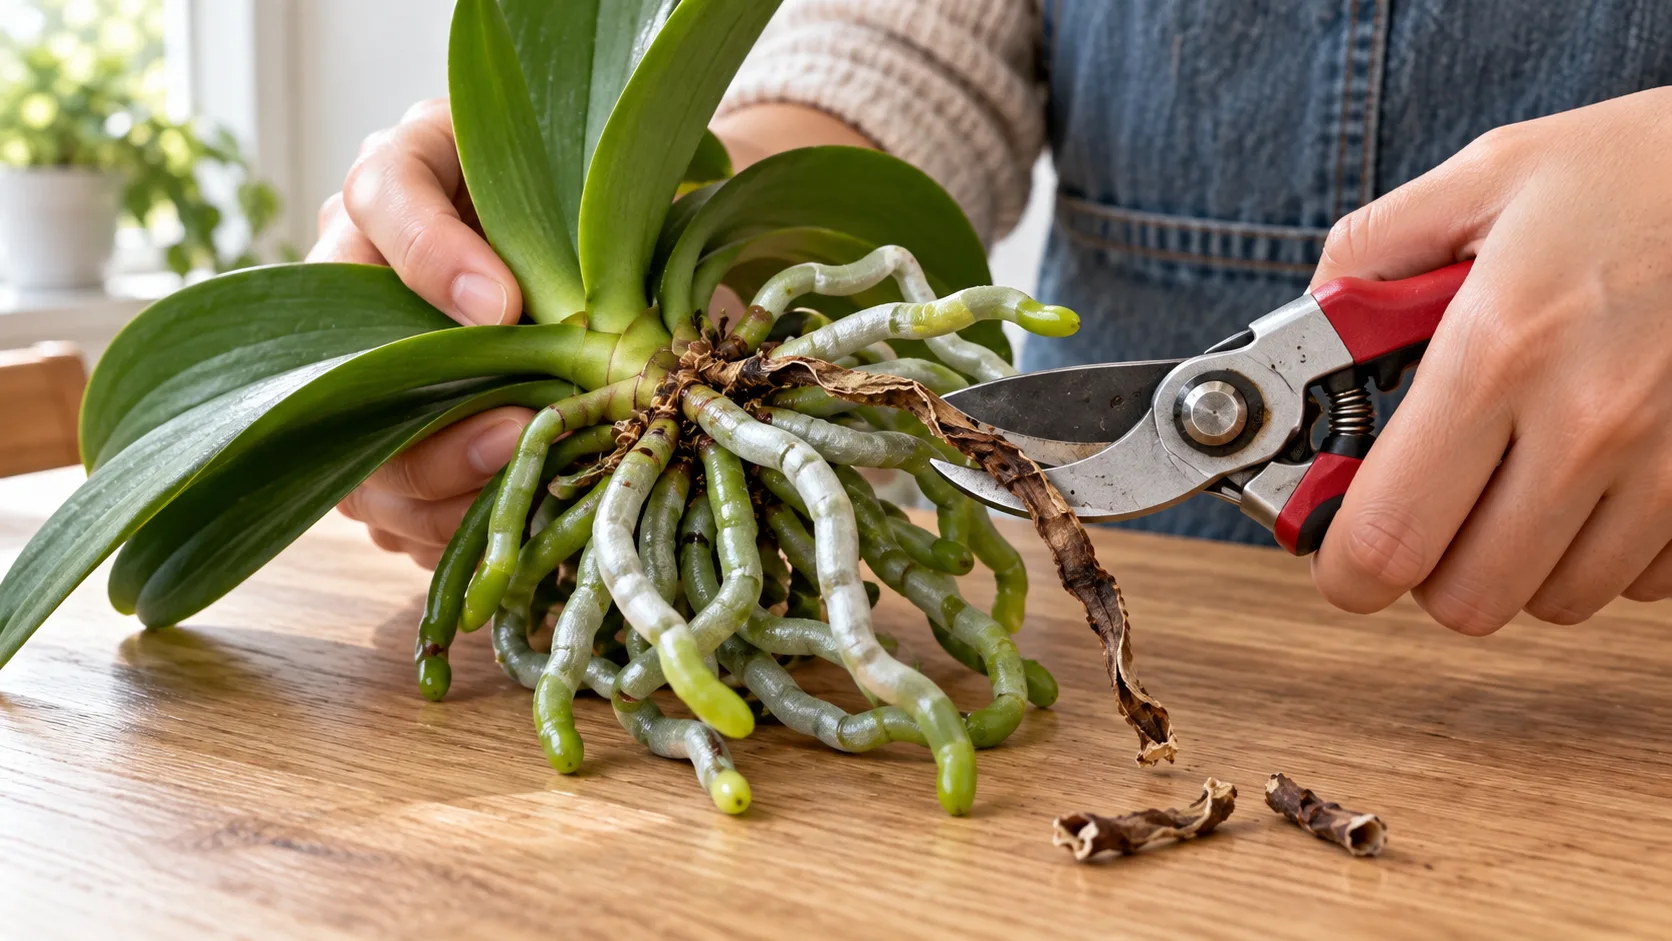
This is the most misleading case: an orchid yellows and wilts as though thirsty while its pot stays too wet. Roots rot in two ways: watering too often, or sitting in decomposing bark.4 Dead roots absorb nothing, creating this paradox: thin, drooping leaves on a well-watered orchid indicate dead roots.4

Bark ages too. As it breaks down, it compacts, becomes less airy, and holds water too long: the RHS advises replacing it every two years.6 The American Orchid Society gives a simple test: if the mix at the bottom feels like soil, repot.1 A white, threadlike mat on rotting bark makes matters worse: it repels water and prevents roots from drinking.4
Take these steps in order:
- Unpot and remove all old bark from between the roots.4
- Cut off brown, soft, or hollow roots with a disinfected tool; keep firm green or silvery roots.6
- Repot in fresh bark, in a pot barely larger than the roots: excess medium stays wet and restarts rot.6
- Water lightly until growth resumes, which takes several weeks to a few months.4
See root rot and overwatering for the mechanism; for a plant standing in water, see emergency repotting for drainage.
Après une pourriture, l'écorce neuve et un pot ajusté font toute la différence : voir comment repot an orchid sans abîmer les racines restantes.
Pour que la pourriture ne revienne pas, le rythme compte plus que la quantité : water an orchid se règle sur la couleur des racines.
Yellow, then black where water collects: rot
Yellowing that starts where water collects, then turns black and soft, is urgent.3 It takes two forms in moth orchids.
Crown rot. Water left in the rosette allows bacteria to multiply and rot the growing point. The plant can no longer produce new leaves there.4 Tilt the pot to drain the crown; the American Orchid Society also suggests a few drops of hydrogen peroxide in the leaf bases, a source treatment suggestion without a concentration specified here or a guarantee of safety or effectiveness. With sufficient reserves, a plantlet may grow from the base below the damaged area.4
Bacterial leaf diseases. Bacterial brown spot is the genus's most common disease: a small watery blister with a yellow or pale-green halo that expands, browns, and becomes sunken. If it reaches the crown, the plant dies. Soft rot starts as small watery spots ringed in yellow and often produces an odor.4
Cut affected tissue back into healthy green tissue with a disinfected blade and isolate the plant. Afterward, water in the morning so leaves dry before night, and never leave water around the crown.2 See bacterial soft rot and other bacterial leaf spots affecting houseplants.
Taches, pourritures et parasites se départagent symptôme par symptôme dans la page orchid diseases avec le traitement de chacune.
Pale yellow-green or a bleached patch: too much sun
Excess light destroys chlorophyll: foliage turns a sickly yellow-green, then leaves fall prematurely.8 Maryland Extension adds a clue: in very strong light, leaves develop pink or red edges and look yellow-green, almost yellow. Healthy leaves are light green; very stiff, dark green leaves suggest the opposite problem, too little light.5
Sunburn is more localized. On the highest, most exposed part of a leaf, a whitish or yellowish scar turns light brown or black. It almost always follows a sudden increase in light, such as a seasonal change or a move outdoors in spring.4 A sunburned leaf remains useful: it still photosynthesizes, and only severely damaged leaves need removing.4
A leaf that feels hot to the touch receives too much light. A sheer curtain in strong summer light often suffices, since glass also reflects sunlight onto leaves.8 The RHS considers an east- or west-facing windowsill ideal in its UK winter setting and advises keeping plants out of direct summer sun.6 In bright, warm conditions, move it about 1 m (3.3 ft) from the glass, the distance used in our moth orchid profile. Adjust to local light and leaf temperature. The orchid care guide details seasonal placement; see low light for the opposite problem.
Sunken or soft leaves after a cold spell
Moth orchids suffer from cold well before freezing: their profile sets a minimum of 15 °C (59 °F) and a preferred range of 18–28 °C (64–82 °F). The RHS aims for nights of 16–19 °C (61–66 °F).6 Chilling that marks leaves can occur once temperatures fall below 10 °C (50 °F).3
Cold causes cells to collapse: surface lesions, sunken areas, discoloration, and tissue that becomes watery, wilts, then browns and becomes vulnerable to secondary infection.4 Risks include a night against cold glass, an icy draft, an unprotected journey in cold weather3, especially cold irrigation water or ice cubes, both explicitly listed by the American Orchid Society.4
Cold water has a distinct pattern: young leaves yellow and soften, then the plant declines. Use lukewarm water, neither cold nor hot.3 After freezing, leaves blacken and become sunken overnight: remove badly damaged leaves to stop infection spreading.1
A windowsill is not the same temperature as the room. On winter nights, an orchid against single glazing can fall below its threshold even in a heated living room: move it away from the glass in the evening.
Several older leaves yellowing: a nutrient shortage
When several leaves yellow together during spring growth, the orchid is breaking down old leaves to build new ones. The American Orchid Society suggests asking whether you fed it during the preceding months.1
Two deficiencies cause this chlorosis:
- Nitrogen: general, progressive yellowing. New shoots stay green initially as available nitrogen moves into them, then they yellow too.7
- Magnesium: it occupies the center of the chlorophyll molecule.1 Deficiency yellows the oldest leaves, which fall, then yellowing moves upward through the plant.7
The American Orchid Society emphasizes magnesium because many fertilizers contain none. With very pure rainwater or reverse-osmosis water, it recommends fertilizer supplying calcium and magnesium, applied regularly at a dilute concentration rather than in heavy monthly doses.1 Blurred-edged yellow spots on young leaves that later deform most often indicate a mineral deficiency, less often a virus. A balanced fertilizer serves as a test in this source guidance: if young leaves regain green, it was a deficiency; otherwise, consider a virus.3
This diagnosis assumes healthy roots: firm, green or silvery, in airy bark. Fertilizer does nothing for rotten roots. Excess causes damage too: fertilizer at every watering builds up harmful salts in the medium, hence the RHS rule to use plain water every fourth watering.6
See nitrogen deficiency, excess salts, and flushing salts from the medium. If veins stay green, yellow leaves with green veins helps distinguish causes.
Le produit, la dose et le calendrier des apports sont détaillés dans choosing orchid fertilizer mois par mois.
Yellow, wrinkled leaves: thirst
A moth orchid has no pseudobulb for water storage: without enough water or humidity, leaves wrinkle, then yellow.5 The pot is light, roots are silver-gray, and bark is pale. The RHS summarizes the risk: roots that become too dry shrivel and die.6
The trap works both ways: Maryland Extension notes that yellowing, wrinkling leaves first mean water is no longer reaching them; inspect roots before deciding why.2
- Soak for ten minutes in a basin of lukewarm water at pot height, then drain completely.9
- 50–70% humidity, according to the species profile. A damp pebble tray beneath the pot helps more than misting, considered insufficient indoors.5
- In summer, water needs follow temperature: the hotter the conditions, the closer together the soaks.8 Use actual local heat and drying as your guide.
See underwatering and low humidity for each case.
Yellow dots, streaks, and mottling
Fine yellow dots, streaks, or rings are unrelated to watering. They come from pests, a virus, or the plant itself.
- Spider mites leave a discolored dot at each feeding puncture; leaves look stippled or mottled, with fine webs underneath in advanced cases. They multiply in warm, dry air, common indoors.4
- Scale insects and mealybugs also cause yellow spots on leaf tops: turn leaves over and look for shields or cottony clusters.1
- A virus produces yellow spots, streaks, lines, or rings that later become necrotic, sometimes with streaked flowers. There is no treatment: isolate or destroy the plant to protect others.4 Only a test confirms it.3
- Regular yellow or white stripes, present from purchase, are variegation: normal and harmless.3

For treatment, see spider mites, scale insects, and mealybugs.
Should you cut off yellow orchid leaves?
Not while they remain firm: a completely yellow leaf will not turn green again, but the plant is still recovering its minerals.1 The right timing depends on the cause.
- Aging bottom leaf: wait until it comes away with a gentle tug.1
- Sun-damaged leaf: keep it while it still functions; remove it only if severely burned.4
- Soft, watery, or black tissue: cut promptly into healthy tissue to prevent infection spreading.1
- Dry, brown leaf: cut it off at the base of the plant.5
Disinfect the blade with alcohol between cuts, especially if you suspect bacteria.
Hampes fanées et vieilles feuilles se coupent chacune à leur endroit : pruning an orchid avec l'outil et le point de coupe.
Helping a yellowing orchid: steps in order
- Check which leaf is yellowing. The lowest leaf alone on a growing plant: do nothing.1
- Take the plant out of its pot as soon as several leaves yellow or soften, and inspect the roots.4
- Remove rotting material: brown, hollow roots and soft, black tissue, using a disinfected tool.
- Correct the cause: fresh bark, bright placement out of direct summer sun, never below 15 °C (59 °F), and lukewarm water. Adjust shading to local light and leaf temperature.
- Judge the next leaf. A new, firm, light-green leaf at the top signals recovery; a repotted plant takes several weeks to a few months to resume growth.4
Les boutons qui jaunissent et tombent avant d'ouvrir ont leurs propres causes, traitées avec la méthode pour get an orchid to bloom again une fois les feuilles saines.
The same reasoning applies to other houseplants, with different thresholds: see yellow monstera leaves or the cross-species overview of yellowing leaves. Unsure of the cause? Photograph the leaf: Floralens identifies the problem and the action to take.
Frequently asked questions
Can a yellow orchid leaf turn green again?
Not if it is completely yellow: an aged, burned, or rotten leaf will not green up, and the plant eventually sheds it. A leaf merely paled by a mild deficiency may regain some green after balanced feeding. Judge mainly by the next leaf: firm, light-green growth signals that the cause has been addressed.
Why is my orchid yellowing while it is flowering?
The lowest leaf alone is normal foliage renewal, common during spring growth. With several leaves, inspect roots and consider deficiency. If buds yellow and drop instead, the usual causes are a draft, a sudden temperature change, or nearby ripening fruit.
How can you tell an orchid needs water?
By the roots visible through the clear pot: green means hydrated; silver-gray means it is time for a soak. The Muséum advises not even waiting until they turn white. Wrinkled leaves are a later sign and can also result from rotten roots.
My orchid has almost no green leaves left. Can it recover?
It depends on the crown and roots. With an intact crown and firm roots, repotting in fresh bark gives it a chance, with recovery over a few weeks to a few months. If the crown has rotted, no more leaves will form at the top, but a plantlet may still emerge at the base.
Should you fertilize a yellowing orchid?
Only if roots are healthy and several older leaves yellow during spring growth: the source identifies this as a deficiency, often magnesium, corrected by dilute complete fertilizer. Fertilizer does nothing for rotten roots. Use plain water every fourth watering to prevent salt buildup.
Where should you place an orchid to prevent yellow leaves?
On an east- or west-facing windowsill in the RHS's UK winter setting, away from direct sun in summer.6 In bright, warm conditions, move it about 1 m (3.3 ft) from the glass; a sheer curtain often suffices if leaves feel hot.8 Follow local light and temperature. In cold winter weather, move it away from glass in the evening: single glazing at night can take it below 15 °C (59 °F).
How can you prevent yellow orchid leaves?
Soak only when roots turn silver-gray, never leave water in the rosette's crown, replace bark every two years, and avoid direct summer sun or cold glass at night. Adjust to local conditions. During growth, use dilute fertilizer containing magnesium, with plain water every fourth watering.